Homemade Cranberry Almond Granola

I love cereal, so I knew swearing off of packaged foods for a month would be tough because I would have to give up my beloved Honey Bunches of Oats. To satiate my cereal yearnings, I decided to try to make homemade granola. I was surprised at just how easy granola is to make and I chastised myself for not making it sooner! This is a recipe you can definitely play with and make your own.

Homemade Granola

2 cups of rolled oats

3 T of honey

2T of brown sugar

1/2 teaspoon of vanilla extract

1/4 teaspoon of salt

2 T of butter

1/2 cup of slivered almonds

1/4 cup of shelled sunflower seeds

1/3 cup of dried cranberries

Set your oven on low broil. Spread your oats out on a cookie sheet and put in the oven for about 5-7 mins. Depending on your oven settings you’ll want to keep an eye on them. Your job is to lightly toast the oats, not to char them. Turn the oven off.

Meanwhile in a skillet, combine honey, brown sugar, butter, vanilla and salt. Stir until butter melts. Then add your toasted oats and let it cook for another 5 minutes. Then stir in your almonds and sunflower seeds and allow it to cook for a few minutes. Finally add your cranberries or other dried fruit.

Spread the mixture back onto your cookie sheet and put it back in your oven (make sure the oven is turned off). Doing this will continue to dry out your oats and make the granola crunchier. Let the mixture sit for about 20-30 minutes in the warm oven.

If you want the granola to stick together more in clusters, add some additional honey and butter. I wanted mine looser like cereal.

Chocolate Cupcakes with Salted Caramel Filling and Buttercream

There are days (ok most days) where I daydream about  opening my own bakery. I hope one day in the future this dream becomes a reality. Two of my friend’s birthdays were last week so they had a joint celebration on Saturday night. I jump at any chance I can to bake and then give the delicious results away because I don’t need 20 cupcakes sitting in my house taunting me to eat them.  And that’s exactly what those sneaky cupcake bastards do. They taunt me to eat them.

I asked my friends what kind of cake they’d want and my friend Ramzi said chocolate and caramel and my friend Adam said he’d never met a kind of cake he didn’t like. My mind immediately went to chocolate salted caramel. I found a great blog, 20 Something Cupakes, that had a recipe that was adapted from Martha Stewart that sounded perfect. Side note: I’m not the biggest Martha fan after she came to speak at my company a few months ago and came across very stuck-up, but they looked delicious so why not?!

Chocolate Salted Caramel Cupcakes


Chocolate Cupcakes

  • 1 1/2 cups all-purpose flour
  • 3/4 cup cocoa powder
  • 1 1/2 cups sugar
  • 1 1/2 teaspoons baking soda
  • 3/4 teaspoon baking powder
  • 3/4 teaspoon salt
  • 2 large eggs
  • 3/4 cup buttermilk (made by taking 1 cup of milk and adding 1T of lemon juice)
  • 3 tablespoons vegetable oil
  • 1 teaspoon pure vanilla extract
  • 3/4 cup warm water
  • Salted Caramel Filling, recipe below

Preheat the oven to 350 degrees F. Line muffin tin with paper liners. Whisk together flour, cocoa, sugar, baking soda, baking powder, and salt. With mixer on low speed, add eggs, buttermilk, oil, extract, and the water; beat until smooth and combined. The batter will appear a little runny, this is ok.

Using a 1/4 cup measure, spoon the batter into liners about two-thirds full. Bake approximately 15-17 minutes, or until a toothpick comes out clean. Transfer cupcakes to wire racks and allow to cool completely.

Use a paring knife to cut a cone-shaped piece (about 1/2 inch deep) from the center of each cupcake. Eat these extra pieces 🙂 or throw them away. Make the salted caramel.

Salted Caramel

  • 2 1/2 cups sugar
  • 2/3 cup water
  • 1 tablespoon light corn syrup
  • 3/4 cup heavy whipping cream
  • 2 1/2 teaspoons flaked sea salt

Heat sugar with the water and corn syrup in a heavy saucepan over medium-high heat, stirring occasionally, until syrup is clear. Clip a candy thermometer to side of pan and stop stirring.

Cook until syrup comes to a boil, washing down sides of pan with a wet pastry brush as needed. Boil, gently swirling pan occasionally, until mixture is caramelized and just reaches 360°F. This process can take upwards of 10 minutes, so be patient. Remove from heat and slowly pour in cream; stir with a wooden spoon until smooth. Stir in sea salt.

Let cool for about 15 minutes; if caramel begins to harden reheat gently until pourable. Spoon 1 to 2 teaspoons warm caramel into each hollowed-out cupcake. The caramel will slightly sink into the cupcake – just add a bit more.

Use the leftover caramel for the frosting and reserve a little bit to drizzle over the top of the cupcakes.

Salted Caramel Buttercream Frosting
  • 2 sticks unsalted butter
  • 1 teaspoon  sea salt
  • 1 teaspoon vanilla extract
  • 3  1/2 cups powdered sugar
  • About 1/2 cup + 2 tablespoons leftover caramel sauce from above

Caramel should now be cool enough to use for the frosting. Make sure it’s slightly warm to the touch, and still pourable. If it’s hardened too much, gently reheat until pourable.

In a mixer fitted with paddle attachment, beat butter and salt together until lightened and fluffy. Reduce speed to low; add powdered sugar and vanilla. Mix until thoroughly combined.

Scrape down the side of the bowl and add the caramel. Beat on medium-high speed for a few minutes until light and airy, and completely mixed. If the frosting looks like it needs to set up a bit, refrigerate it for 15 – 20 minutes. The caramel walks a fine line between being either too warm, or too thick and not pourable if it gets too cool, so this affects the temperature of the frosting and you may need to compensate for that by refrigerating if the caramel warmed the frosting too much. Taste the frosting if it’s too salty, you can add a little more powdered sugar.

Use a pastry bag with an open-star tip and pipe frosting onto each cupcake, swirling tip and releasing as you pull up to form a peak. Garnish each by drizzling leftover caramel over the cupcake. I also garnished with a piece of salted caramel.   Store at room temperature in airtight containers.

Makes approximately 20 cupcakes.

The cupcakes turned out awesome.  Since the recipe calls for cocoa powder, the cake was just chocolatey enough without being overpowering. The salted caramel was deliciously salty and sweet and just oozes out of the cupcake when you bite into it. It’s a nice surprise for those not knowing it’s in the middle. The buttercream was also just the right combo of salty and sweet. I got a lot of rave reviews, which always make me know when a recipe is a keeper.

Day 1 of No Processed Foods Month: Kale Pesto

My friend Rachel decided the month of May should be no processed foods month. It’s been something I’ve been meaning to try for awhile, so I eagerly agreed. It’s always good to have a buddy for things like this to keep you honest. Rachel recruited a few other co-workers too so we all plan to share this challenge together. I love to cook, but I’m also single and I find it really hard to cook for one. I figured this would force me to stop being lazy and reaching for that frozen Trader Joe’s dinner and really start cooking fresh, healthy food. I’m really excited to try all sorts of new recipes and make things that I usually cop out and buy.

I’m not going to be uber strict about the rules. I figure if I make it from scratch it counts. I’m not going to shy away from things like regular flour and chocolate chips. I’m also not going to be totally crazy and make my own yogurt or cheese. I will however make my own breads.

I recently blogged about my love of kale, so I decided to make a kale pesto with pappardelle (no I didn’t make the pasta), but in the coming weeks I do plan on trying to make my own pasta including gnocchi.

Kale Pesto


1 bunch kale, leaves torn off

1/4 cup toasted pine nuts

2 cloves garlic

1/4 cup shredded Parmesan

1/2 cup olive oil

salt & pepper

1 package papparadelle

Leave the stalks on your kale to make cooking easier. Start by bringing a large pot of water to a boil. While you are waiting for this to boil, prepare a bowl with cold water and ice.  Quickly plunge the kale leaves in the boiling water and then remove and put it into the cold water to stop it from cooking too much. Drain the kale in a colander and then lay it on paper towels and allow it to dry for a bit. Cut the stalks off the kale and strip it down to just the leaves. Squeeze out any extra moisture.

Melt 1/2 tablespoon of butter in a skillet on medium heat. Add the pine nuts and lightly toast for about 5-7 minutes.

In your food processor add the peeled cloves of garlic, Parmesan cheese, toasted pine nuts, and kale.  Pulse the food processor off and on while streaming in your 1/2 cup of olive oil. Add salt and pepper to taste and pulse a few more times.

Meanwhile, cook pasta to your liking. Drain the pasta, and return it to the pot. Reserve a little of the pasta water (1/4-1/2 cup). Add your pesto and some water to keep your pasta from sticking together. Garnish with extra pine nuts and cheese. The finished product turned out great and was a nice change from the traditional basil pesto I’ve made in the past.

Sweet & Savory Apple Cinnamon Coffe Cake


Apple Cinnamon Coffee Cake

There are two things that you should know about me before we go any further, dear readers.  1) Breakfast is my favorite meal of the day.  And, 2) I will choose sleeping in over getting up in the morning every time.  What this means is that I love cooking and eating delicious things for breakfast, but alas that never happens on a week day.  During the week, I have a quick and easy fiber bar for breakfast every morning.  While not totally delectable, it gets the job done.  Meanwhile, all week I look forward to the weekend, when I will be able to make something much more interesting and decadent – and all at the much more reasonable hour of 10am.

This weekend, I was having some lovely lady friends over for brunch on Saturday and I knew that I wanted to make something special.  Over the last several weekends,  I have been forced to get creative with egg dishes because our chickens are way out-pacing us with their egg production.  But today, I put my foot down.  I was going eggless.

So, I headed for my grandmother’s recipe box.  For those of you who are arriving fashionably late, I am slowly working my way through all of my grandmother’s recipes over the course of a year.  I found a delightful sounding recipe for apple cinnamon coffee cake, which calls for nary an egg.  Eggcellent.  Forgive me, I just couldn’t resist!  (If you click on the image, it will enlarge the recipe so that you can read it better.)

Apple Cinnamon Coffe Cake Recipe

Apple Cinnamon Coffe Cake, Part 2

This recipe is fairly easy if you have a food processor, or do not mind cutting in butter by hand.  Me, I’d rather hand hoe an entire football field than cut in butter by hand.  But, I realize that you may feel differently.  Heck, you might even enjoy it.  If you are one of those people, we might need to talk.  But, I digress.  The first step is adding all of the dry ingredients to your food processor and mixing them together briefly.

Mix the dry ingredients together.

Next, add your butter is small pieces to the food processor and give it another really good mix.  You should end up with what looks like fine sand.

Cutting in the butter

Then, the last step of making the dough is adding milk to the food processor and mixing it to form a soft, pliable dough.

The dough should be soft and pliable.

With floured hands, scoop the dough out of the food processor and pat it into the bottom of a greased, 8-inch pan.  Don’t worry if your top looks lumpy.  You’ll be covering it!

Pat the dough into an 8-inch, greased pan.

Next, you are going to peel and slice 2 and 1/2 apples up into thin slices and place them, overlapping on the top.  I used one Granny Smith and two Fuji apples.  I thought it provided just the right about of sweet to pair with the more savory dough.

Lay the apples, overlapped, on the top.

Lastly, dot the apples with butter and mix the sugar and cinnamon together in a small bowl and them pour it over the top of the apples.  I didn’t end up using all the cinnamon/sugar mixture.  I tend to like recipes less sweet than what they call for.

Ready for the oven!

Then, place the dish in a 375 degree oven for 40-45 minutes.  I think I ended up cooking mine for about 55 minutes.  When you take it out of the oven it should be nice and bubbly and golden brown.

I love the way this coffee cake turned out.  I don’t like super sweet things for breakfast.  It had the perfect balance of slightly salty (the dough) and sweet (the baked apples).  Give it a try for yourself and let me know if you agree!

The finished dish!

Apple Cinnamon Coffee Cake

Garlicy Kale with Cherry Tomatoes

I know Jen just posted a a kale recipe, but I had one in the works too. I’d never really had kale before, I know shocking. Jen and I talked about our mutual love for kale over the Easter holiday and tried to figure out why our mom never served it to us growing up.

I recently went to a cooking class with some friends and one of the simple recipes I learned was for garlicky kale with cherry tomatoes. I’m going to say that adding a 1/4 cup of olive oil is totally ok since kale has fiber and loads of vitamin A and C. Everything in moderation people. Plus our cooking instructor called the sauce the juju and talked about just how important it was for the juju to be amazing. I couldn’t agree more.

This is a tasty side dish that can be made really quickly.

Garlicky Kale with Cherry Tomatoes

2 cups of kale, chopped

4 cloves of garlic, chopped

1 cup of cherry tomatoes cut in half

1/4 cup of olive oil

salt and pepper to taste

Put a pot of water on the stove to boil. Meanwhile,  in a pan on medium high heat add the 1/4 cup of olive oil. After the oil is heated add your 4 garlic cloves. You want the garlic to toast, but not burn. Then add the tomatoes and let them cook for 2-3 minutes so that they start to break down. Once your water boils, pour it over your kale in a colander to blanch the kale. Then add your kale to your pan and mix with the other ingredients and let it wilt a bit more. These amounts are not exact so feel free to add more oil, garlic, salt and pepper based on taste.

Chicken Tikka Masala

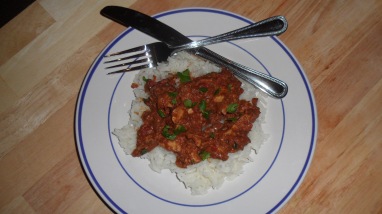
So a few posts back I talked about my first attempt at making Naan. Well, I had to have something to go with the Naan, so I made chicken tikka masala with my gay husband Jonathan. Actually he made more of the chicken tikka masala and I focused on the naan. It was a tag team Indian feast night. I found the recipe on the Pioneer Woman’s blog, but in true cooking fashion, we made a few tweaks.

Chicken Tikka Masala

Adapted from Pioneer Woman’s reicpe

Ingredients

  • 4 Chicken Breasts
  • Ground Coriander
  • Cumin, To Taste
  • 1/2 cup Greek Plain Yogurt
  • 6 Tablespoons Butter
  • 1 whole Large Onion
  • 4 cloves Garlic
  • 1 piece (approximately 2 Inches) Chunk Fresh Ginger
  • Garam Masala
  • 1 can (28 Ounce) Diced Tomatoes
  • Sugar
  • 1/2-3/4  cup Heavy Cream
  • 2 cups Basmati Rice
  • Fresh cilantro
  • Red pepper flakes

Preparation Instructions

Start by seasoning the chicken breasts with some  salt. Next sprinkle them on both sides with some coriander and cumin. Then spread Greek yogurt on the top and bottom of the chicken breasts. Set the chicken on a metal cooling rack over a foil-lined baking sheet and place it about 10-12 inches below a broiler for 5-7 minutes per side. This will make clean up much easier. The chicken should be slightly blackened.

Next dice the large onion. In a large skillet melt 2 tablespoons butter over medium-high heat. Toss in the onions and sauté until they are slightly browned. As the onions cook, mince your garlic. Next, cut off the outer skin and mince or grate a 1 by 2 inch chunk of fresh ginger using a microplane. Add the garlic and ginger to the onions and about 1 tbsp of salt.

Next you are going to add about 3 tablespoons Garam Masala spice. To add some heat, I added red pepper flakes. Then add the can of diced tomatoes. Continue cooking and stirring, scraping the bottom of the pan to deglaze it. Add about 1 tablespoon sugar. Let this mixture simmer on medium for about 5 minutes.

Meanwhile follow directions on your Basmati rice to make 2 cups.

After the Tikka Masala sauce has had a chance to simmer for a little bit, add in about 1/2-3/4 cups of heavy cream. I wanted to go a little bit lighter on the cream. Next, chop up your chicken breasts into chunks and stir them into the Tikka Masala sauce. To add some color, add some chopped cilantro to the top.  Serve the rice with the Chicken Tikka Masala over top.

Sopping up the extra sauce with a piece of homemade Naan bread is the best part! Enjoy!

Posted by Ree on September 11 2009


Posted by Ree on September 11 2009

Garlic Sesame Kale

I have been in love with the garlic kale on the Whole Foods salad bar for the last several years.  I have tried to recreate it in my kitchen on a number of occaions.  (Especially recently, as the warm winter caused the kale in my garden to grow into a small forest. )  The concoctions that I came up with, while tasty, were not the same as the Whole Foods rendition.  Then, a Whole Foods employee kindly showed me that each of their foods has a posted recipe list.  Hallelujiah!  With this little tidbit of information, I came up with my own Garlic Sesame Kale.  Here is the what you’ll need:

The ingredients

Here is the recipe:

  1. A large bunch of kale (the more the better!)
  2. 2 tablespoons of Tamari
  3. 2 1/2 tablespoons of Tahini
  4. 1 1/2 tablespoons of lemon juice
  5. 3 tablespoons of nutritional yeast
  6. 2 teaspoons of chopped or pressed garlic
  7. 3 teaspoons of sesame seeds (optional)
  8. a dash of cayenne pepper (optional)
  9. water (for thinning — if needed)

Wash the kale and set it aside in a large salad bowl.  Then, in a food processor add ingredients 2-7 and blend until smooth.  (I use a mini processor so that I can just put the bowl in the fridge.)

My mini food processor gets the job done!

The finished dressing

Once smooth, pour the mixture over the kale, garnish with sesame seeds (if you want) and then you are ready to eat!  (If you are someone that does not like raw kale, you can steam it in an iron skillet with a little water for a few minutes to wilt it slightly before dressing it.)

Garlic Sesame Kale

It really is one of the VERY best recipes I have every tried with kale.  I eat it now as a snack when I get home instead of indulging in carbohydrates.  Nutritious and delicious!

Vegetarian Navy Bean Soup

As a vegetarian, I have a close and loving relationship with beans.  The best time of my life was taking a bicycle trip through Costa Rica and eating the same beans and rice at every meal for a month.  Ahhhh, frijoles……how I love you so.

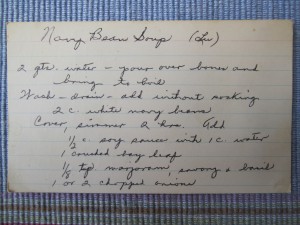
As I’ve been working my way through my grandmother’s receipe box, I came upon a recipe for Navy Bean soup.  Remarkably, until now, I’ve never cooked navy beans.  I’m not even sure if I’d ever eaten them.  This is probably high treason for a vegetarian.  So, when I came upon this recipe in Grangi’s box, I immediately added it to the queue.  This recipe seems to have been given to Grangi by her sister, my wonderful and amazing great Aunt Lucy, who very recently passed away.  She was 99 years old.  One more reason to make this soup – another small way that I can remember her.

The recipe itself is fairly simple, really.  I did, however, need to figure out some other flavor besides bones.  So, I used Better than Bouillon vegetable base, which I find adds a lot of good flavor.  I also did not use the traditional soy sauce called for, as it isn’t my favorite.  Instead, I went with Tamari sauce.  I think it’s flavor is more complex and I thought it would pair nicely with the beans.  Here is what you’ll need:

Navy beans are not beans that you need to soak overnight, which is nice.  I am really a “fly by the seat of my pants” kind of girl.  For this recipe, you only need to be proactive about three hours in advance.  Yes, please!

For the first step, you add two quarts of water and the amount of Better Than Bouillon indicated on the lid/per amount of water to the beans in a large pot and simmer for two hours.  You’ll need to stir them occasionally during this time to ensure they aren’t sticking to the bottom and that you still have adequate water.  If you begin running low on water, just add some more.  I ended up needing to add about 2 more cups of water during the 2 hours to ensure the beans were still covered well.

When the beans are finished cooking and tender after the two hours are up, add the spices, Tamari, chopped onion, and salt (if needed) to the pot and simmer for another 20 minutes. At the end of the 2o minutes, the onion will be nice and tender.  Remove the bay leaf, and then using a food processor, process 2/3 of the beans to give the soup a creamy consistency.

Process 2/3 of the beans for a creamy consistency.

Then, all you have left to do is ladle it into bowls and garnish with some fresh chives.  The soup was delicious and had a nutty, hearty taste.  The recipe calls for garlic croutons, which I didn’t have time to make.  (Next time!)  Instead, I whipped up some quick cheddar cheese, garlic buisuits to go with it.  All in all this recipe was easy to execute, has simple ingredients that you’d have on hand, and scored rave reviews at our dinner party.  I will definitely be making it again!  Thanks Aunt Lucy!

Vegetarian Navy Bean Soup

Blintzes, the new Crêpe.

One of DH’s all-time favorite things I make for breakfast is the blintz.  Blintzes, which are basically crêpes that have been sautéed, are a second cousin to the crêpe and very French.  Have I mentioned that I love all most things French?  Therefore, they are also a favorite of mine.  DH usually eats his slathered in Nutella.  While I love Nutella, it’s a little too sweet for my breakfast liking.  So, I set out today to create something filling (get it?) that would satisfy us both.  Thus, my Lemon Blueberry Blintzes were born.  Here is what you’ll need:

Lemon Blueberry Blintz ingredients

I also discovered a new use for DH’s old money clip, which he hates because he says it ruins the magnetic strip on his credit cards.  Slip a recipe into a plastic sleeve (splatter protection) and slap it up on the fridge.  Better than a cookbook stand!

New use for an old money clip.

I made the blintz batter first so that it can rest in the fridge for a while.  I find that this makes for the best texture.

Blintz Batter recipe:

* 3 eggs

* 1/2 teaspoon salt

* 3/4 cup all purpose flour

* 1 and 1/3 cups milk (lowfat ok)

* 2 tablespoons melted butter, plus additional for cooking

Homemade Ricotta Cheese Recipe:

* 1 quart of milk (whole is better, but I used 1%)

* 1 small container (1 1/2 cups) of greek yogurt (I used Oikos)

* 2 tsp. of lemon juice

* 1 tsp. of salt

* cheese cloth

* strainer

Filling Recipe:

* 1 cup of homemade ricotta cheese

* 2 oz. of cream cheese

* 4 Tbs. of powdered sugar

* 1 lemon (all of the juice and zest)

* 1 egg

Preparation:

Again, I make the batter first so that it can sit in the fridge for a bit.  Combine (in this order!) the eggs, salt, flour, milk, and 2 tablespoons melted butter.  Make sure that when you add the melted butter you do so a little bit at a time, so as not to cook any of the egg.  Mix well.  If I had a good food processor, I’d mix in that.  Then, refrigerate the batter while you work on the filling.

Normally, I would have just used Ricotta from the store.  But, I didn’t have any and was really too lazy to leave my PJ’s and quickly run to the grocery store.  Don’t judge.  You know how comfy PJ pants are.  So, I decided to make my own.  Of course, if you use store-bought ricotta the recipe goes very quickly.  In a large pot while gently stirring, I heated the quart of milk, the Greek yogurt, the lemon juice and the salt to a boil.  I let it boil for three minutes.

Making the ricotta

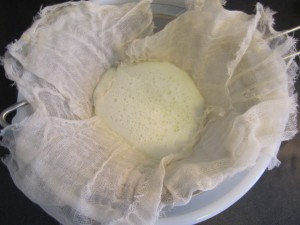
While it was cooling, I placed cheesecloth inside of a strainer over a large bowl.

Cheesecloth inside of strainer, over a large bowl

Then, I poured the cooled milk mixture into the cheesecloth in increments.
Pouring the ricotta mixture through cheesecloth.

I have decided you must have the patience of a saint to make cheese.  It takes FOREVER to let the whey drip from the cheesecloth into the bowl.  I’m not going to lie, I gave up and eventually gathered my cheesecloth into a small packet and squeezed. I was hungry!

1/2 of my ricotta cheese

Now that I had my cheese, I could make the rest of the filling.  In my mixing bowl, I combined the ricotta cheese, the cream cheese, the egg, and the powdered sugar and beat it until it was nice and creamy.  While it was mixing, I juiced the lemon and zested it.  Then, added the juice and zest to the mixer and incorporated it.  Then, I put the filling in the refrigerator and pulled the batter out.

Making the filling

Yummy, tangy lemon zest!

Finished filling

Place a skillet or omelet pan over medium heat.  If it’s not a nonstick pan, brush it lightly with butter.  (Or, do this anyway.  Butter makes everything better!)  Pour in a small amount of batter – just enough to cover the bottom of the pan well—and tilt the pan in all directions to coat evenly.  For the size of my pan, that equates to a scant 1/4 cup.  Cook over medium heat until the edges of the crêpe begin to pull away from the side of the pan (This will happen quickly.)  Then, channel your inner-Julia Child and flip it over!  The higher it gets, the more points!  Let it brown briefly on the other side and then turn the crêpe out onto a clean, dry towel.  Repeat until you’ve run out of batter.

Cooking the crêpes

Crêpes waiting for filling

Take the filling out of the fridge.  Then, place filling onto each crêpe and roll.

Fill those crêpes up!

Now, in order to transform your crêpes into blintzes, you must sauté them.  Add a little bit of butter back to your pan and then place into it the folded crêpes.

Cooking the blintzes

Using medium heat, sauté until golden brown on each side.  Then, plate them and cover them with some yummy blueberry syrup.  I used some that I had canned last summer.  If you don’t have this, I think that raspberry jam would also go really nicely with the subtle lemon flavor of the filling.

Lemon Blueberry Blintzes

Lemon Blueberry Blintzes

The true test came when DH tried them.  He gave them two thumbs up and said that he would happily forego the Nutella for a less-sugary, more substantial and delicious option.  What are your favorite breakfast foods/recipes?

Graham Cinnamon Scones with Homemade Blueberry Butter

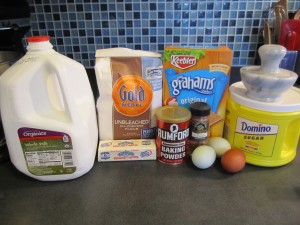
I had been looking forward to this weekend for so long.  Not only was the weather supposed to be beautiful, but two of our favorite people invited us for brunch,  Mike & Susan.  It had been so long since we’d seen them.  Hooray for coming out of winter hibernation mode.   So….what to make?  After looking through Grangi’s recipe box, I decided on Cinnamon graham scones.  Here is what you’ll need:

Ingredients for cinnamon graham scones

And, here is the recipe:

Graham Cinnamon Scone recipe

Now, the recipe calls for graham cereal, but I decided to use graham crackers.  (It’s what I had on hand).  This meant, that I needed to use my mortar and pestle to grind up some graham crackers.

Graham crackers to graham flour

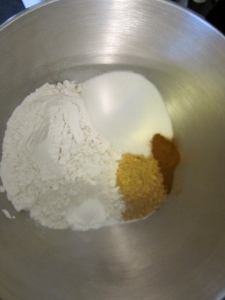
Next, you need to combine all of the dry ingredients in a large bowl.

Mix the dry ingredients

After you have mixed the dry ingredients, add the eggs, butter and milk and then mix the dough until it forms a ball.

Scone dough

Turn the dough out onto a floured surface and divide it into three equal parts.

Rolling out the scone dough

Now here is where I deviated a bit from the recipe.  It tells you to first put the dough onto a lightly greased baking sheet and then roll it into a six inch circle.  One, I found that my cute little french rolling pin would not fit easily into my baking sheet.  And two, I wouldn’t be able to cut my scones into proper shapes if they were already stuck to the butter on the sheet.  So, I just rolled everything out on my cutting board.  Problem solved.

Rolling and cutting scones into triangles.

After transferring the scones to the baking sheet, I brushed them with egg and sprinkled them with turbinado sugar.

Scones pre-baking

These little babies cook up so quick, it’s almost like instant gratification.  10 minutes later, I add some homemade blueberry butter and…………..cue deliciousness.

Graham cinnamon scones with homemade blueberry butter

This weekend was fun, but very busy.  So, while I worked diligently on the projects in my queue (Amy Butler Blossom Bag, Colette Sorbetto blouse, etc.), I didn’t get any of them completely finished.  I’m going to hold off posting anything on them until I can show you a finished project.  That should be later this week.  Until then, happy crafting and enjoy the spring weather!